
Starlink Installation Guide Complete Setup Instructions
Setting up your Starlink Installation Guide doesn’t have to be daunting. Starlink by SpaceX has brought high-speed internet to even the most remote areas, and with this guide, you’ll have your system up and running in no time.
What’s Included in the Starlink Installation Guide?
The Starlink Kit contains everything you need for setup:
- Starlink Dish (Antenna): The heart of the system, connecting you to the satellite network.
- Router: Enables your Wi-Fi network.
- Cables: Includes power and data connections.
- Kickstand or Mount: For dish stability.
By following this Starlink Installation Guide, you’ll maximize performance and avoid common pitfalls during setup.
Step 1: Selecting the Best Location
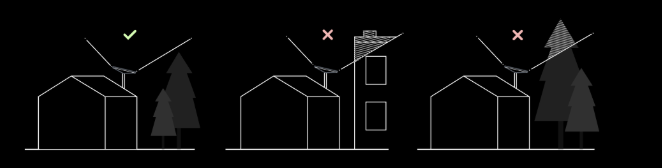
Importance of a Clear View
- A clear view of the sky is critical for Starlink to maintain an uninterrupted connection with satellites.
- Use the Starlink App to scan for any obstructions before starting the setup process.
Step 2: Assembling the Starlink System
- Connect the Components:
- Attach the dish to the power supply using the provided cable.
- Connect the router to the power supply.
- Position the Dish:
- Use the kickstand or an appropriate mount to place the dish in a stable location.
Following this Starlink Installation Guide, ensure all connections are secure and in place.
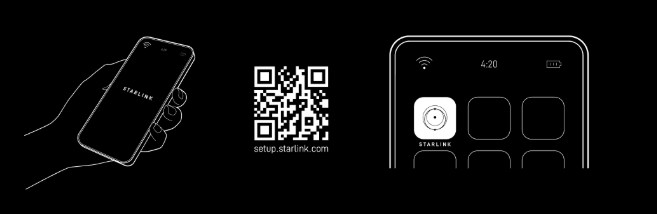
Step 3: Configuring Your Network
Powering On the System
- Plug in the power supply and allow the dish to align itself automatically.
Setting Up Wi-Fi
- Use the Starlink App to configure your network:
- Connect to the “STARLINK” Wi-Fi network.
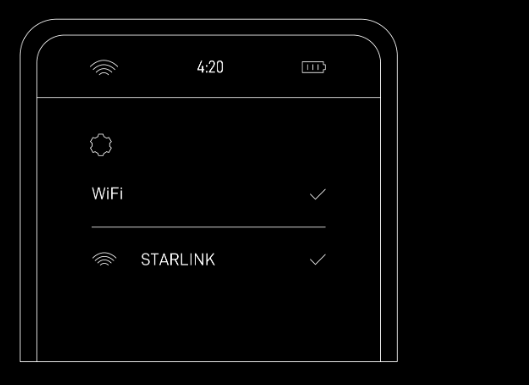
- Create a custom network name and password.
Advanced Tips for Starlink Installation Guide
- Extending Wi-Fi Coverage:
- Consider using mesh routers for better range in larger homes.
- Bypass Mode for Third-Party Routers:
- Activate bypass mode via the app if you prefer a different router.
The light on the router reflects its current status and functionality. Here’s what each indicator means:
Router Light Status Indicators

- Flashing White Light: The router is attempting to connect. Once the setup is complete, it will either turn solid white (connected to the internet) or solid red (unable to connect within 20 minutes).
- Solid White Light: The router is successfully connected to the internet. The light will automatically turn off after 1 hour.
- No Light: The router has no power. If a connection is established, the light will turn off after 1 hour.
- Red Light: Indicates the router is not connected to the internet.
- Violet Light: The router is in bypass mode, disabling its Wi-Fi functionality. This light will turn off after 1 hour, but a factory reset is needed to exit bypass mode.
Using the Extra RJ45 Ports on the Router
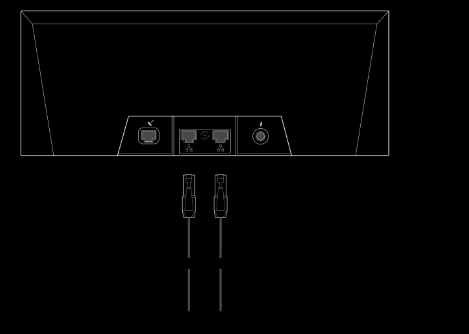
To utilize the additional RJ45 ports on your router, follow these steps:
- Remove the RJ45 Cover: Locate the RJ45 cover on the back of the router and carefully remove it.
- Connect an Ethernet Cable: Plug one end of your Ethernet cable into port 1 or port 2 of the router.
- Connect to Third-Party Hardware: Attach the other end of the Ethernet cable to the desired third-party hardware, such as a computer, switch, or external router.
Maintenance and Troubleshooting
Routine Maintenance
- Regularly inspect the dish for debris or damage.
- Clean snow or ice off the dish during winter.
Resolving Issues
- Use the Starlink Installation Guide steps to troubleshoot common problems such as slow speeds or dropped connections.
You Mgiht be interested in: Fed Up with Internet Downtime? Starlink Internet will Fix Everything
Conclusion
This Starlink Installation Guide provides a straightforward process to set up your system efficiently. By following these steps, you’ll enjoy reliable, high-speed internet no matter where you are. For advanced configurations, refer to the app or reach out to Starlink Support.